In this article, I will show one of the most common things you will need to know when you are creating an application, how to consume API endpoints in .NET MAUI using Refit, this tutorial has been created using a Prism Template, see how in the following link.

After you create your project, the firs thing we shall do is, add the Refit package from the NuGet Package Manager or Console.
Install-Package Refit -Version 6.3.2Now we shall create a new folder in our project called ApiConfiguration and we shall create an interface inside called JsonPlaceHolderApi (for this tutorial, we are using Json Place Holder API Fake to test this app) and copy and pasted in your interface the following code.
public interface JsonPlaceHolderApi
{
   [Get("/posts")]
   Task<IEnumerable<ApiPost>> GetPost();
}
Inside the ApiConfiguration folder, create a new folder called ApiModels and add a new class inside called ApiPost, I told you before that we are using Json Place Holder as fake API, go to the following link and select all (Ctrl + A) and Copy (Ctrl + C), if you are using Visual Studio in Windows, just go to the class that we have created already and click inside, click in Edit -> Paste Special -> Paste Json As Classes or just copy and paste the following code and after that, go to the JsonPlaceHolderApi interface and add the using for the class. (in case you are using MacOS, use the following link to create your class).
public class ApiPost
{
   public int userId { get; set; }
   public int id { get; set; }
   public string title { get; set; }
   public string body { get; set; }
}
Before we continue with this tutorial, I would like to clarify something, lets go to the JsonPlaceHolderApi, as you see inside, we have a method called GetPost and this method has an attribute to specify the http method that we shall use to consume that endpoint, in this case GET and inside the attribute we specified the and point route for that method and we are returning a collection of ApiPost object, in case you want to add more enpoints, you only need to follow this example.
Let’s continue, go to the your view model MainPageViewModel and replace everything inside, with the following code.
public class MainPageViewModel : BindableBase
{
    public ObservableCollection<ApiPost> PostList { get; set; } = new();
    JsonPlaceHolderApi jphServcice;
    public MainPageViewModel()
    {
        jphServcice = RestService.For<JsonPlaceHolderApi>("https://jsonplaceholder.typicode.com/");
        new Action(async () => await LoadData())();
    }

    async Task LoadData()
    {
        var Posts = await jphServcice.GetPost();

        foreach (var PostItem in Posts)
        {
            PostList.Add(PostItem);
        }
    }
}
And do the same with the MainPage View replace the code with the following.
<?xml version="1.0" encoding="utf-8" ?>
<ContentPage xmlns="http://schemas.microsoft.com/dotnet/2021/maui"
             xmlns:x="http://schemas.microsoft.com/winfx/2009/xaml"
             Title="Post List"
             x:Class="RefitMaui.Views.MainPage">

  <CollectionView ItemsSource="{Binding PostList}">
    <CollectionView.ItemTemplate>
      <DataTemplate>
        <StackLayout>
          <Frame BorderColor="Gray"
                 CornerRadius="5"
                 Padding="8"
                 Margin="10,5">
            <StackLayout>
              <Label Text="{Binding title}"
                     FontSize="14"
                     FontAttributes="Bold" />
              <BoxView Color="Gray"
                       HeightRequest="2"
                       HorizontalOptions="Fill" />
              <Label Text="{Binding body}"/>
            </StackLayout>
          </Frame>
        </StackLayout>
      </DataTemplate>
    </CollectionView.ItemTemplate>
  </CollectionView>

</ContentPage>
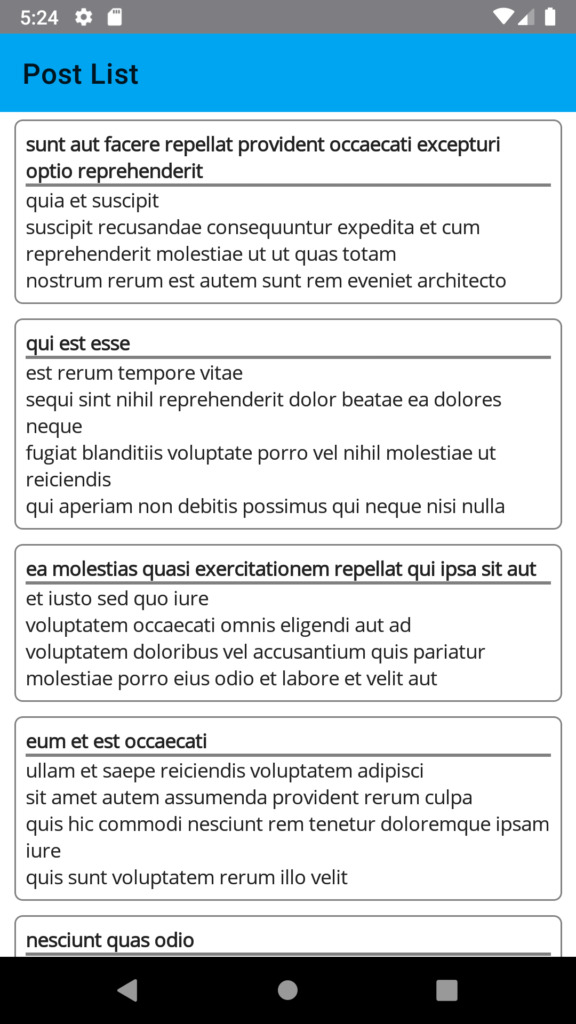
Now just run the project on you emulator, I’m using windows, so, I will show in an Android Virtual Device and this is the result.

If you like this post, please share a comment and don’t forget to share the post with others, see you next time.
I cannot aww link for that this tutorial has been created using a Prism Template.
Could you show this link?